- Moderator
- #1
Add compatibility to Teensy 2 board + Led strip WS2801
(from Adafruit) to MediaPortal with Atmowin / Atmolight.(up to 256 channels )
Hardware can work with Boblighthd with Adalight firmware ( no tested yet )
All Requirements for working solutions:
Ambilight Hardware:
Teensy 2 (with or without program inside ‘flashing lost all data inside!!!!’)
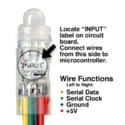
Led strips WS2801 ( or other compatible with FastSPI )
Power DC …
Firmware AtmoDuino4Teensy_vX.ino http://code.google.com/p/ambilight-4-mediaportal/source/browse/#git/Hardware/Atmoduino/Teensy 2/Atmoduino Firmware
Sellers available for this pack :
(UE) France : MediaHD.fr http://www.mediahd.fr/34-ambitv
if you are a seller and you offer this pack or equivalent which works with this tutorial, let us know!
Flashing Software:
Serial Drivers (include in TeensyDuino ) http://www.pjrc.com/teensy/serial_install.exe
Arduino IDE 1.0.3 : http://arduino.cc/en/main/software
TeensyDuino 1.11: http://www.pjrc.com/teensy/td_download.html
FastSPI LED mod for Teensy 2 : http://code.google.com/p/ambilight-4-mediaportal/source/browse/#git/Hardware/Atmoduino/Teensy 2/Atmoduino Firmware/FastSPI_LEd_4_Teensy_2
Ambilight Software : Actually all software are available here :
MPEI package by legnod available here:
Atmowin 0.50 modded ( Atmoduino protocol) Rick164 blog :
https://bitbucket.org/RickDB/atmoduino/overview
https://bitbucket.org/RickDB/atmowin-atmoduino-mod/downloads
MediaPortal https://www.team-mediaportal.com/mediaportal-download
Atmolight patched for your MePo version ( all version can be found in MediaPortal forum)
- Forum link :
- English : https://forum.team-mediaportal.com/...-process-plugin-update-25-05-2010-v1-9.75840/
- German : https://forum.team-mediaportal.com/threads/neues-plugin-atmolight-plugin.76173/
- German ambilight dedicated: https://forum.team-mediaportal.com/...thread-sedu-board-led-stripes-atmowin.104785/
Procedure !
Flashing Firmware :
Install Arduino IDE
Install TeensyDuino on Arduino folder
Replace FastSPI in plugin folder from here
If your update FastSPI
Verify this
Code:
// Leonardo, teensy, blinkm
#elif defined(__AVR_ATmega32U4__)

#define SPI_PORT PORTB
#define SPI_DDR  DDRB
#define SPI_PIN  PINB
#define SPI_MOSI 2	  // Arduino pin 10.
#define SPI_MISO 3	  // Arduino pin 11.
#define SPI_SCK  1	  // Arduino pin 9.
#define SPI_SSN  0	  // Arduino pin 8.
			// Replace  Teensy 2 PB2 = 2 , ... , ...
#define DATA_PIN 2	  // PB2, pin 10, Digital16
#define SLAVE_PIN 3	 // PB3, pin 11, Digital14
#define CLOCK_PIN 1	 // PB1, pin 9, Digital15
#define LATCH_PIN 0	 // PB0, pin 8, Digital17
#define TIMER_AVAILABLE 1
Now your system is ready for flash Teensy Board.
Open, Modif & Flash Firmware
Open firmware file AtmoDuino4Teensy_vx.ino
Verify this line code, from your Hardware
Add “//” for disable line code and Del it for activate line
NUM_LEDS xxx : set your numbers of led
Data rate : set data rate for adapt to your Led strip for don’t have flickering
This firmware use SPI Hardware set in FastSPI library
Code:
//Set the number of leds in the strip.
#define NUM_LEDS 150

// Sometimes chipsets wire in a backwards sort of way
//struct CRGB { unsigned char b;  unsigned char r;  unsigned char g; };
//struct CRGB { unsigned char r; unsigned char g; unsigned char b; };
struct CRGB { unsigned char r;  unsigned char b;  unsigned char g; };

  //Change this to match your led strip
  //FastSPI_LED.setChipset(CFastSPI_LED::SPI_SM16716);
  //FastSPI_LED.setChipset(CFastSPI_LED::SPI_TM1809);
  //FastSPI_LED.setChipset(CFastSPI_LED::SPI_LPD6803);
  //FastSPI_LED.setChipset(CFastSPI_LED::SPI_HL1606);
  //FastSPI_LED.setChipset(CFastSPI_LED::SPI_595);
  FastSPI_LED.setChipset(CFastSPI_LED::SPI_WS2801);

  //Change datarate to match your led strip as well
  FastSPI_LED.setDataRate(2); // Data Rate set to (2) for Adafruit ID 322 12mm bullet because is 5V led strip
When your Firmware is OK !
For Flashing click “Verify” and press button on Teensy board for Flash it !
Teensy flashed -> Install Atmowin (UAC need to be Off ) !
When Teensy reboot, if your firmware is OK, all led should show “fade-in / fade-out”
Red > Blue > Green
(DC power must be connected!) (For reboot teensy unplug USB cable)
<<< don’t forget to install serial drivers if you use Ambilight on other PC !! >>>
Close all Software. And verify if “java.exe” is running , if yes, kill it !
Now, you can extract Atmowin to “c:\atmowin “
UAC need to be OFF
Register all files ! as described in Atmowin readme file!
Explanation from RickDB repo .
Setup
· Start AtmowinA.exe
· Device -> Select "Atmoduino"
· Select "Configure device" and select your Arduino COM port and set the number of leds
· Set number of leds in zones top/left-right/bottom, the total of the zones should result in the same amount as set in the number of leds before.
· Save (OK) / exit (kill) and restart Atmowin.
· Select "Configure software adjustment" and set:
White balance software - On
Red/Green/Blue - 254
Gamma correction - Global
Global 0.5
Recommended settings for dynamic ambilight (smooth transitions)
· Darkness limit 0
· Filter threshold 67%
· Filter smoothness 30%
· Edge weighting 13 (depends on the screen size)
Select “ColorChanger LR” for show Led !
Atmowin OK -> Install Atmolight ( + patched Core ) !
Unpack Archives, to MediaPortal folder
Start MP configuration.exe > plugin & set Atmolight plugin.
Now, you are ready for use your Ambilight with MediaPortal …
We will not be held responsible for any misuse, or damage to your equipment, that is designed to help and share!
Testing Video / Pictures :
Many files for testing are available on :
Thank you to :
MediaHD.fr kestouf for lent me hardware
Atmowin / Atmolight : gemx / angie05 / MacGyver2k
Atmoduino : Rick164 / scorpie
forum help : legnod Dragy
Last edited:

 France

