EDIT: I am working on a new setup of this and will post here when completed. The new setup will allow the addition of Series info by means of TVGuide.com. As an added bonus, the channel mappings produce a greater number of Auto-Mappings.
Thanks goes out to zap2xml for the recent updates allowing all this to be possible!
This is an effort to ease the install and configuration of the xmltv plugin included with MP1 and MP2.
While Schedules Direct and others require the use of a paid service, the following uses a free service, as such I have documented and moved over to it.
Any and all comments or recomendations are welcome. Once this has been tested by others, I will ask it becomes a Sticky.
Info Source:
Create an account on tvschedule.zap2it.com
Edit your account for the area code and service (Cable Company, OTA, Etc. )
Close your browser.
Download zap2xml ( http://zap2xml.awardspace.info/ ) EDIT: Author requested download from his site only... My Bad...
NOTE: Think of the best place to install zap2xml.
I choose to install it on the root of my F:\TVGuide drive and directory in order to make it easier to locate and configure the scheduling.
This allows the application to continue to get updates even while I am doing Clean Installs for testing and, at any given time this folder can take up 12Plus megs of space depending on the number of channels.
Once zap2xml is installed:
Download from this thread the xmltv.zip file, unpack it, and copy the xmltv.dtd file to:
C:\ProgramData\Team MediaPortal\MP2-Server\SlimTVCore\v3.0\xmltv\
Open the folder where you installed the zap2xml.exe and create a file called zap2xmlrc.txt
Add the following lines within this new text file
NOTE: Do not include the Quote Marks after the Equal Sign
days="put the # of days you want downloaded every day"
user="UserName used on zap2it.com"
pass="Password used on zap2it.com"
outfile="F:\TVGuide\tvguide.xml" ---- As I said above - This is My Location and File Name Used
Save and Close the file.
From the same location, run the zap2xml.exe with the following command line
zap2xml -u tvguideuser@email.xx -p password -o myfile.xml
tvguideuser@email.xx == Your zap2it username
password ==Your zap2it password
myfile.xml == tvguide.xml
Once started you should see a new tvguide.xml file in this folder.
NOTE: This can take a few minutes to complete... F5 within the folder and monitor the size of the file.
Once completed, you can open the tvguide.xml
There should be channel and guide within it.
Example:
<tv source-info-url="http://tvschedule.zap2it.com/" source-info-name="zap2it.com" generator-info-name="zap2xml" generator-info-url="zap2xml@gmail.com">
<channel id="I91649.labs.zap2it.com">
<display-name>2.2 WBBMDT2</display-name>
<display-name>2.2</display-name>
<display-name>WBBMDT2</display-name>
</channel>
MediaPortal TV Configuration
Open the MediaPortal 2 TV Configuration

Configure your TV Tuner

Complete a channel scan

NOTE: You can view the channels found while the scan is running and you can go back to the scan to monitor its completion.

Click on Plugin's
Put a check mark next to xmltv
Click on xmltv under Plugin's
Under the General Tab, change the location of the TVGuide.xml to where your file is
NOTE: You Must Uncheck the box Import files in the new tvguide.lst

Click on Import
NOTE: If all goes as planned, this may take some time to complete and will populate
Last import run at:
Total channels imported:
Total programs imported: This will get populated after we map the channels.
Click on Mappings (If it does not change to Mappings, the Importer is Still running, Once the importer is done the Mappings tab will open)
Place a Check Mark on Partial match
Pull down the Group and choose All Channels
Click on Load/Refresh

Once Loaded, Click Save
NOTE: The MediaPortal TV Configure window can be dragged to make larger making it easier to configure.
The channel mappings might not locate some or all your channels.
To resolve this, locate the MP2 Server Log file and open it (Leave the TV Configure Open)
The channels will be in the same order within both the Server Log and TV Configure.
Do a find for your first channel (mine is CBS2-HD)
Use the maj:# and the min:# to now locate (thru the pull down) the correct channel mappings.

Example From Server Log:
[2015-12-13 14:00:20,632] [9340335] [80 ] [DEBUG] - atsc:Found: ATSC:tv:Terrestrial CBS2-HD Freq:-1 ONID:1 TSID:999 SID:1 PMT:0x0 FTA:True LCN:2001 phys:12 maj:2 min:1 mod:Mod8Vsb
Repeate the steps for all the other channels
Click on the General Tab and then Click the Import Button again.
NOTE: Because we have now completed the mappings of all channels, this will take some time and should fill in all the imported info

Task Scheduler:
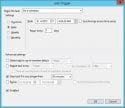
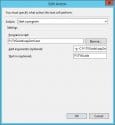
To automate the download and install of the TVGuide, create a Task Schedule
Here are the setting I currently Use


Thanks goes out to zap2xml for the recent updates allowing all this to be possible!
This is an effort to ease the install and configuration of the xmltv plugin included with MP1 and MP2.
While Schedules Direct and others require the use of a paid service, the following uses a free service, as such I have documented and moved over to it.
Any and all comments or recomendations are welcome. Once this has been tested by others, I will ask it becomes a Sticky.
Info Source:
Create an account on tvschedule.zap2it.com
Edit your account for the area code and service (Cable Company, OTA, Etc. )
Close your browser.
Download zap2xml ( http://zap2xml.awardspace.info/ ) EDIT: Author requested download from his site only... My Bad...
NOTE: Think of the best place to install zap2xml.
I choose to install it on the root of my F:\TVGuide drive and directory in order to make it easier to locate and configure the scheduling.
This allows the application to continue to get updates even while I am doing Clean Installs for testing and, at any given time this folder can take up 12Plus megs of space depending on the number of channels.
Once zap2xml is installed:
Download from this thread the xmltv.zip file, unpack it, and copy the xmltv.dtd file to:
C:\ProgramData\Team MediaPortal\MP2-Server\SlimTVCore\v3.0\xmltv\
Open the folder where you installed the zap2xml.exe and create a file called zap2xmlrc.txt
Add the following lines within this new text file
NOTE: Do not include the Quote Marks after the Equal Sign
days="put the # of days you want downloaded every day"
user="UserName used on zap2it.com"
pass="Password used on zap2it.com"
outfile="F:\TVGuide\tvguide.xml" ---- As I said above - This is My Location and File Name Used
Save and Close the file.
From the same location, run the zap2xml.exe with the following command line
zap2xml -u tvguideuser@email.xx -p password -o myfile.xml
tvguideuser@email.xx == Your zap2it username
password ==Your zap2it password
myfile.xml == tvguide.xml
Once started you should see a new tvguide.xml file in this folder.
NOTE: This can take a few minutes to complete... F5 within the folder and monitor the size of the file.
Once completed, you can open the tvguide.xml
There should be channel and guide within it.
Example:
<tv source-info-url="http://tvschedule.zap2it.com/" source-info-name="zap2it.com" generator-info-name="zap2xml" generator-info-url="zap2xml@gmail.com">
<channel id="I91649.labs.zap2it.com">
<display-name>2.2 WBBMDT2</display-name>
<display-name>2.2</display-name>
<display-name>WBBMDT2</display-name>
</channel>
MediaPortal TV Configuration
Open the MediaPortal 2 TV Configuration
Configure your TV Tuner
Complete a channel scan
NOTE: You can view the channels found while the scan is running and you can go back to the scan to monitor its completion.
Click on Plugin's
Put a check mark next to xmltv
Click on xmltv under Plugin's
Under the General Tab, change the location of the TVGuide.xml to where your file is
NOTE: You Must Uncheck the box Import files in the new tvguide.lst
Click on Import
NOTE: If all goes as planned, this may take some time to complete and will populate
Last import run at:
Total channels imported:
Total programs imported: This will get populated after we map the channels.
Click on Mappings (If it does not change to Mappings, the Importer is Still running, Once the importer is done the Mappings tab will open)
Place a Check Mark on Partial match
Pull down the Group and choose All Channels
Click on Load/Refresh
Once Loaded, Click Save
NOTE: The MediaPortal TV Configure window can be dragged to make larger making it easier to configure.
The channel mappings might not locate some or all your channels.
To resolve this, locate the MP2 Server Log file and open it (Leave the TV Configure Open)
The channels will be in the same order within both the Server Log and TV Configure.
Do a find for your first channel (mine is CBS2-HD)
Use the maj:# and the min:# to now locate (thru the pull down) the correct channel mappings.
Example From Server Log:
[2015-12-13 14:00:20,632] [9340335] [80 ] [DEBUG] - atsc:Found: ATSC:tv:Terrestrial CBS2-HD Freq:-1 ONID:1 TSID:999 SID:1 PMT:0x0 FTA:True LCN:2001 phys:12 maj:2 min:1 mod:Mod8Vsb
Repeate the steps for all the other channels
Click on the General Tab and then Click the Import Button again.
NOTE: Because we have now completed the mappings of all channels, this will take some time and should fill in all the imported info
Task Scheduler:
To automate the download and install of the TVGuide, create a Task Schedule
Here are the setting I currently Use


Attachments
Last edited:

 United States of America